Deployment Automation
Chapter 1
Overview
It cannot be over-emphasized the importance of deployment. When a developer completes unit testing, deployment is often needed to update the latest changes to testing servers for systems integration testing and user acceptance testing. Then the production server needs a deployment. The deployment is often packaged into an executable file called “Install.exe”. Rintagi itself requires deployment from time to time. Because it is self-generated, Rintagi can be upgraded frequently via its automated deployment package “Install.exe”. It can then be used to upgrade its generated applications. The following has been automated for the cloud version of Rintagi. This document is only for on-premises use only.
Prerequisite
Project owner can config and provide proper license file to two different package types. (eg. If the license is for object code(PDT), then add the license txt file into "Rintagi/Project Name/Shadow/PDT" folder. If the license is for Source code(PTY), then add the license txt file into "Rintagi/Project Name/Shadow/PTY" folder.)
Release Content
During deployment, Rintagi overwrites the old programs with the new programs (including stored procedures). However, table structure changes must not be overwritten or the data integrity would be compromised. For this reason every time the data model is modified, Rintagi automatically creates the necessary change script to be executed upon the next release for all table structure changes. For example, a change has been made to a table as follows:
Command: Data Tier -> Table and Column
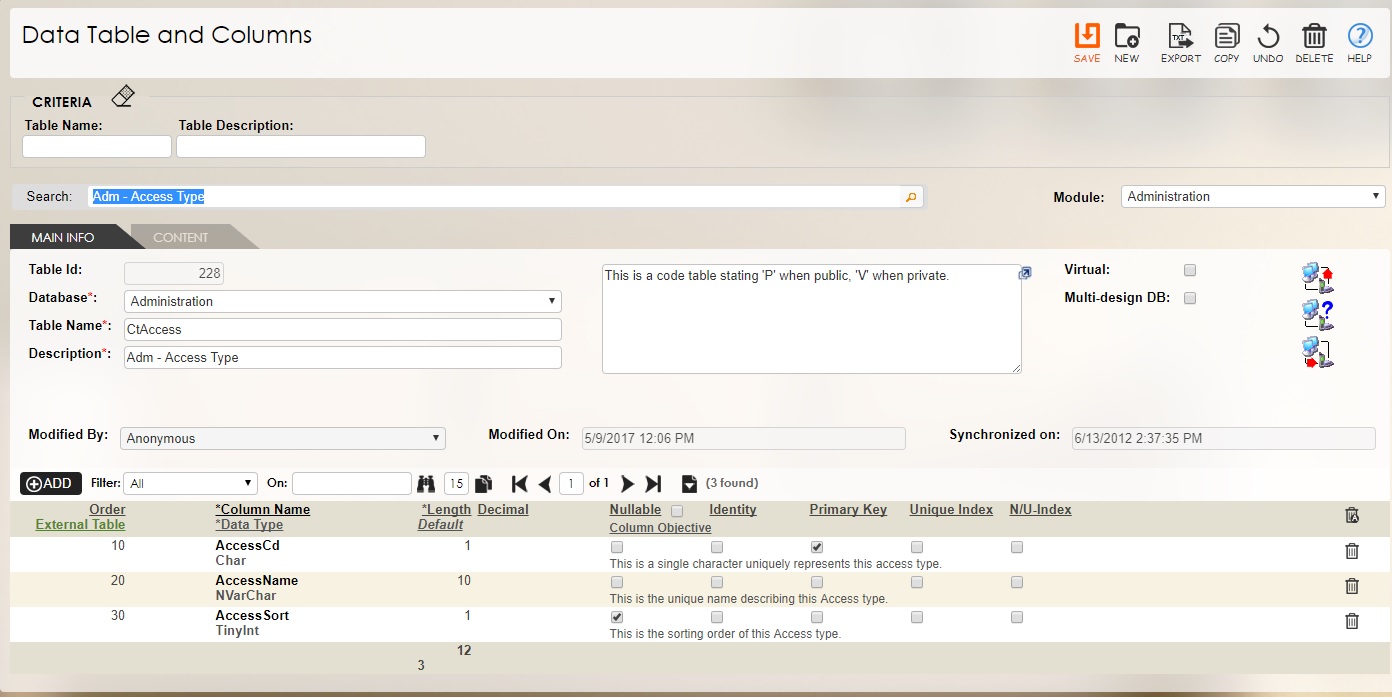
By clicking the ![]() icon, not only will the logical changes be implemented to the physical database, but a change script will be created and posted to the current version of the “Release Content”.
icon, not only will the logical changes be implemented to the physical database, but a change script will be created and posted to the current version of the “Release Content”.
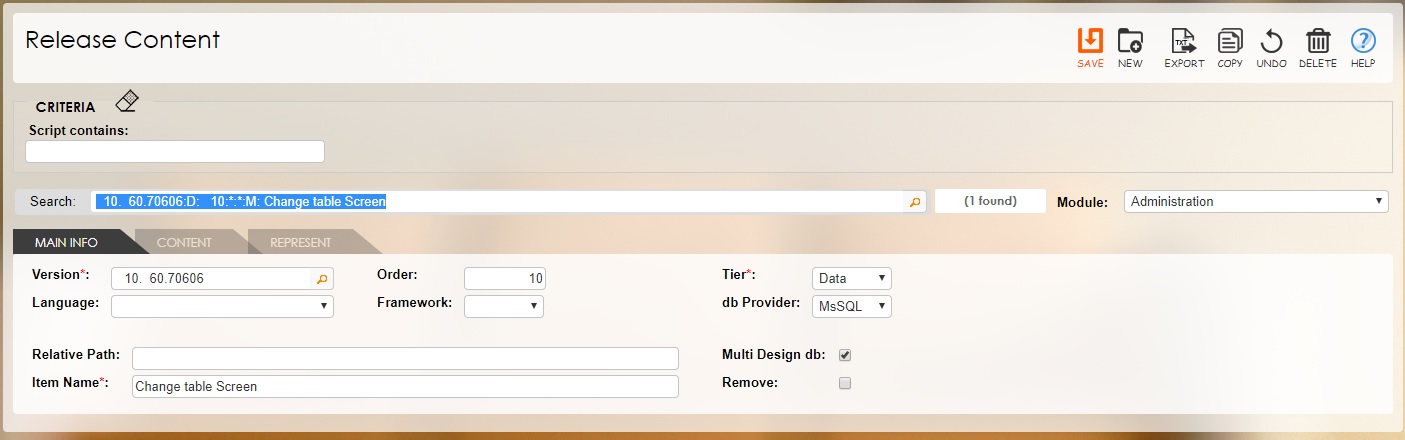
Command: Operation -> Version Manager -> Version Content
| Schema Characteristics | Description |
|---|---|
| Version | The item belongs to this version release. |
| Order | The order of execution for this item within the version (ideally begins at 10 for each tier and continues at intervals of 10). |
| Tier | Selects the appropriate tier this item represents. Current selections are Data, Client and Rule although only Data is being used here. |
| Language | Selects the appropriate computing language that this item is written in. This is not relevant when Data is the chosen tier. |
| Framework | Selects the appropriate framework that this item is written for. This is not relevant when Data is the chosen tier. |
| Db Provider | Selects the appropriate database provider that this item is written in. |
| Relative Path | The relative path for client/rule tier items ending with "\". Null represents current path. This is not relevant when Data is the chosen tier. |
| Item Name | The program name or a description for one-time script. |
| Multi-Design Db | Check this if the same table appears in all design databases. Otherwise, table appears in application database only. This is checked only for Rintagi databases. |
| Remove | Check this if this item is to be removed instead of added/updated. This is not relevant when Data is the tier chosen. |
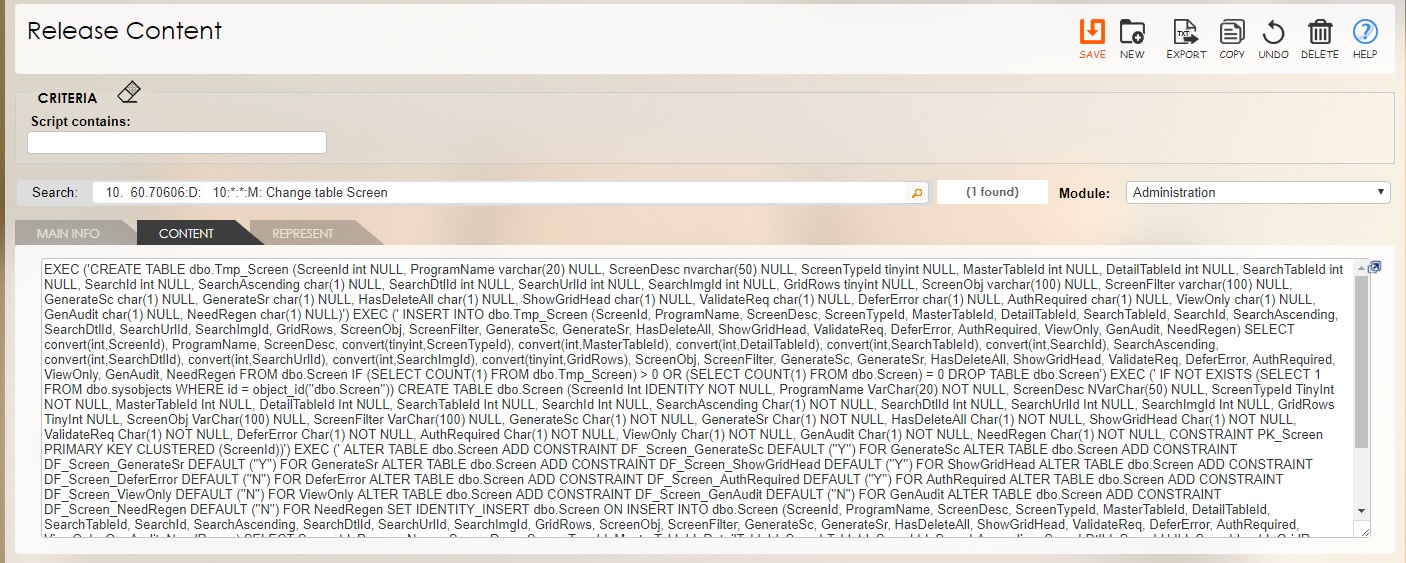
| Script | Paste the Unicode content representing this item here; Use [[?]] to substitute the namespace, i.e. [[?]]Design. |
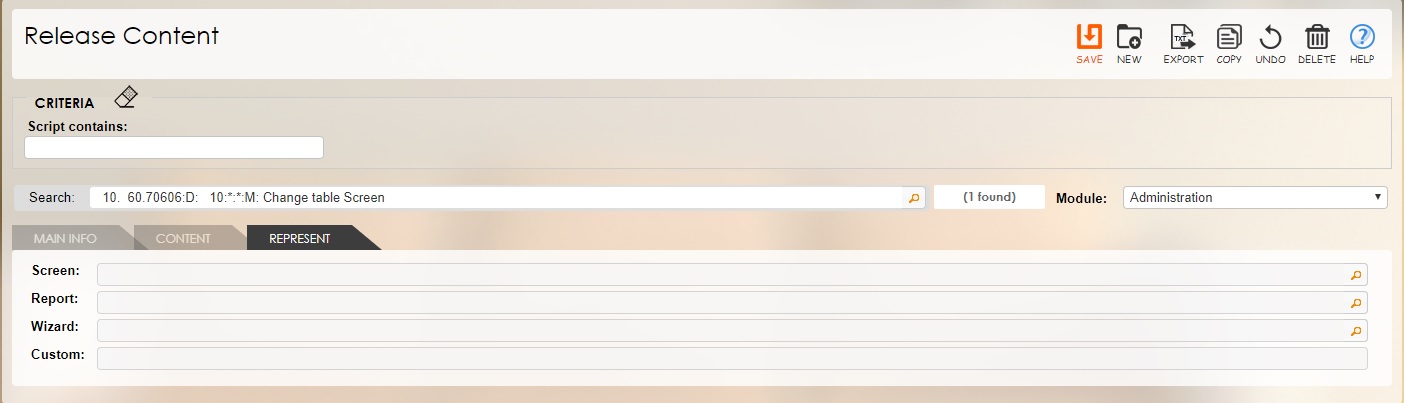
| Screen | The screen from which this item is generated, if applicable. This is not relevant when Data is the tier chosen. |
| Report | The report from which this item is generated, if applicable. This is not relevant when Data is the tier chosen. |
| Wizard | The wizard from which this item is generated, if applicable. This is not relevant when Data is the tier chosen. |
| Custom | The custom structure from which this item is generated, if applicable. This is not relevant when Data is the tier chosen. |
Release Tracking
When ready to deploy, assign a date to the release with a version number higher than the last one. All the scripts from the above release contents will be executed during all future deployments as they are now dated later than the version number found in the applications to be upgraded.
Command: Operation -> Version Manager -> Version Tracking
![]()
![]()
| Schema Characteristics | Description |
|---|---|
| Major Version # | The major version number for this release (between 1 to 9999). |
| Minor Version # | The minor version number for this release (between 0 to 9999). |
| Release Date | The date for this release (should not be filled until ready to release). |
| Culture By | This release tracking was last updated in this culture |
| Value of Release | This is the token value to demonstrate the importance of this release to the stakeholders; this is being converted from the above culture currency to the currency of the current culture |
| Deployment | Click the icon on the right to upload a document or click the trash icon to delete unwanted documents immediately. |
| Release Content | Click the appropriate link to ‘view’/‘add’/‘edit’ release content. |
| Prerequisite | This describes the prerequisite for this release. |
| Read me | The miscellaneous notes for this release. This is particularly useful for additional requirements that have to be implemented manually. |
Chapter 2
Prepare Release
To package a release, a developer with administrative rights may access the following screen. Typically four items need to be established for each release:

The above is to satisfy the following scenarios respectively:
- First instance of deployment to a production site,
- First instance of making an exact copy of the application for prototyping purpose,
- Upgrade an existing production site,
- Upgrade an existing prototype application.
There is another scenario for upgrading the Rintagi portion of the application for development purpose which will be covered in the last chapter.
Command: Generation -> Deployment -> Configure Installer
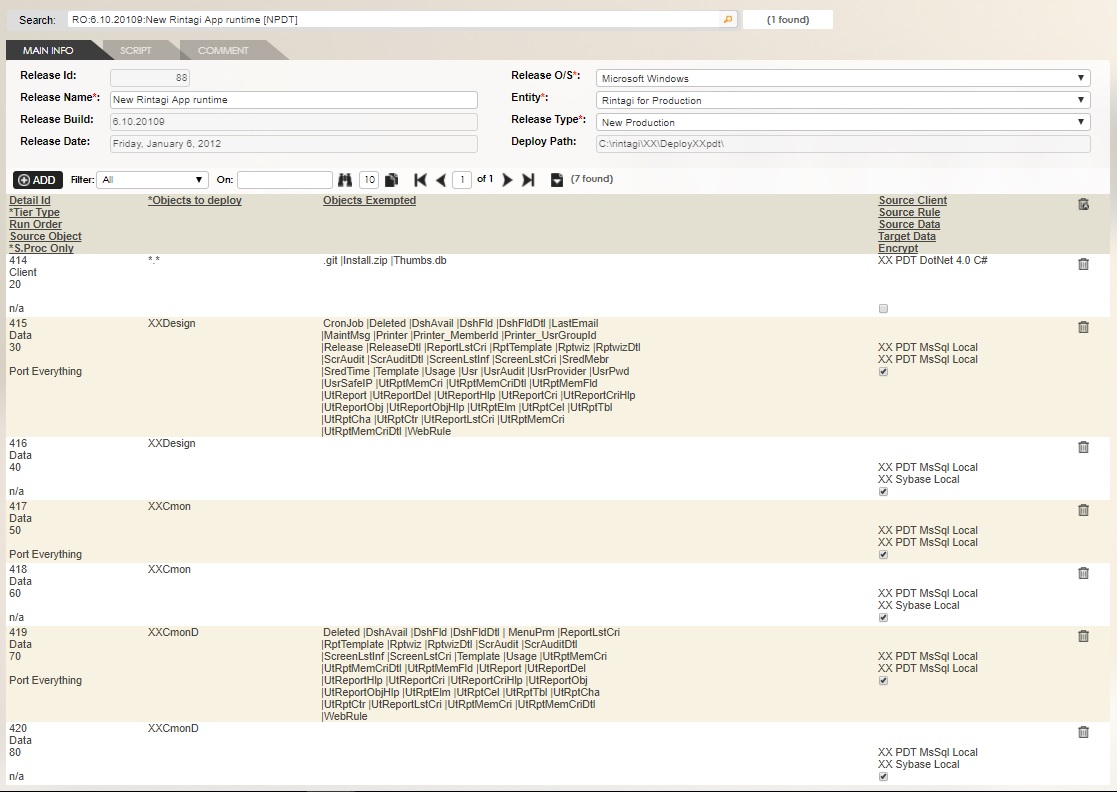
| Schema Characteristics | Description |
|---|---|
| Release Id | The internal identification that uniquely represents this release. |
| Release Name | A brief description for this release. |
| Release Build | The unique number in the format (Major#.Minor#.Build#) where Major# and Minor# are user-defined and Build# is the last digit of year plus month and date of release. This will be automatically updated. |
| Release Date | The date for this release. This will be automatically updated. |
| Release O/S | The operating system for this release. |
| Entity | The entity of this release as defined in earlier volumes. |
| Release Type |
This is the release type of this release. The five available choices are:
|
| Deploy Path | The deploy path defined by the entity. |
| Script | The SQL script to be executed at the end of each Data Tier upgrade. This is rarely used as Release Content has covered most of the requirements. |
| Comment | This is a comment on this deployment package. This is rarely used as Release Tracking has covered this requirement. |
| Tier Type | The tier type of this release. Current selections are Client, Rule, Data, and Service. |
| Run Order | The unique execution order for this release item. |
| Objects to deploy | The objects to deploy separated by ‘|’ or ‘n/a’ for not applicable. |
| Source Object | The alternate source object to be used, if applicable. |
| Objects Exempted | The objects to be exempted separated by ‘|’, if applicable. For a new installation; only the data is exempted. |
| Source Client | The source for Client Tier deployment. |
| Source Rule | The source for Rule Tier deployment. |
| Source Data | The source data-source for Data Tier deployment. |
| Target Data | The target data-source for Data Tier deployment. |
| S.Proc Only | The choice to be made on database deployment. Current selections are:
|
| Encrypt | Check if target procedures should be encrypted. Do not attempt to deploy stored procedures when source procedures are already encrypted. |
Chapter 3
Compile Release
After all the above release items are fully prepared, if this is a new application and this is first compilation of the installer, the installer needs to be compiled manually by including the four newly created directories of contents into the project and embedding all the resources. After the first successful compilation, developers with administrative rights may compile this release by using the following wizard screen:
Command: Generation -> Deployment -> Compile Release
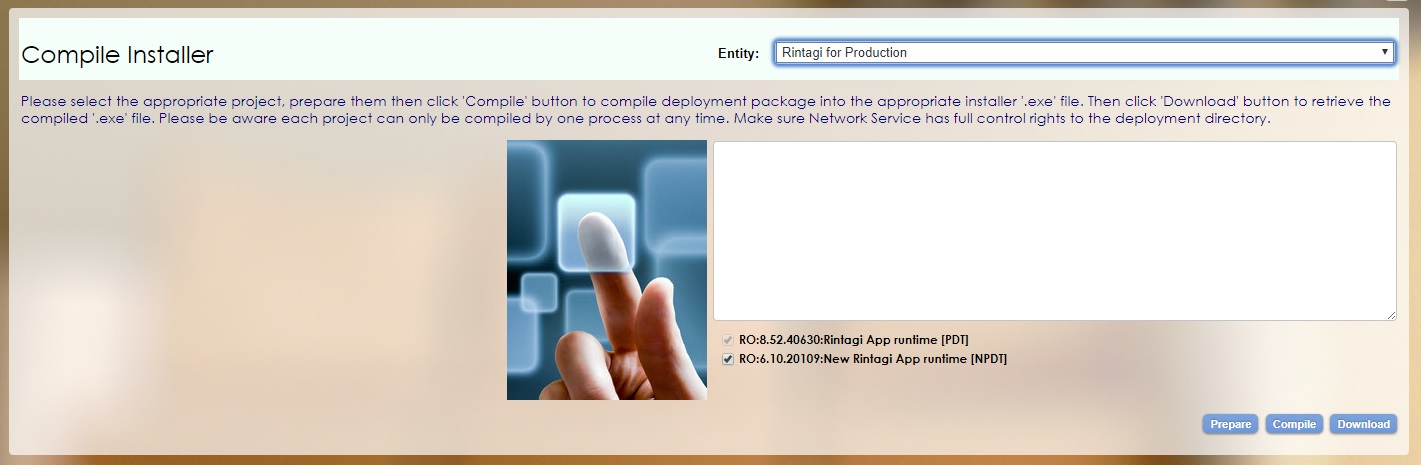
Clicking the “Compile” button will trigger the compilation process for this release. After several minutes the single installer executable “Install.exe” will be ready in the bin\release directory within the “DeployPath” specified in the Entity table. A success message will be displayed as follows:
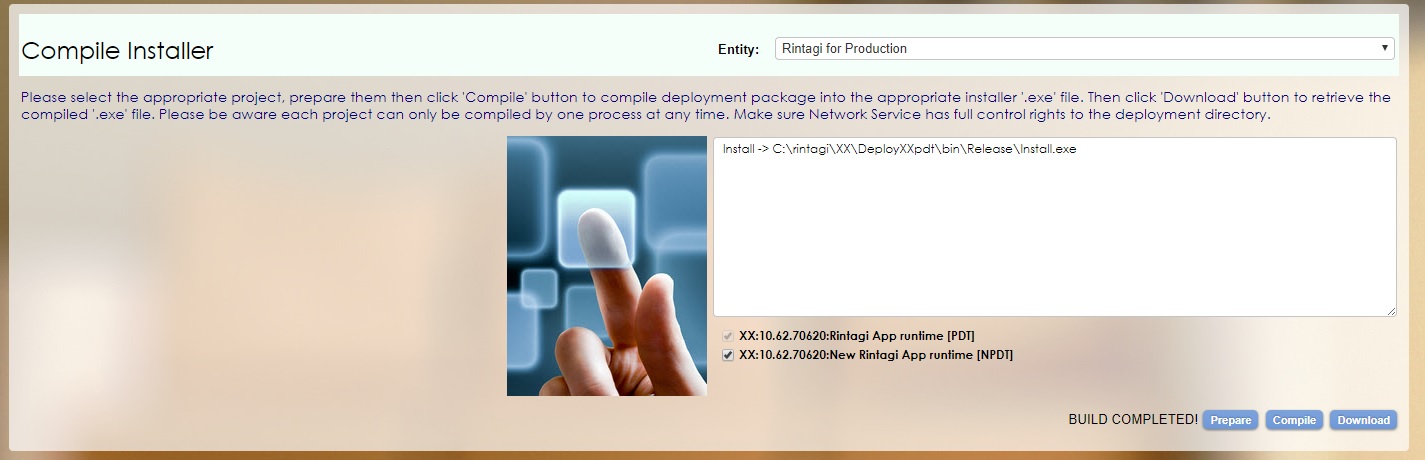
Clicking the “Download” button will compress the file “Install.exe” and prompt to save as an “Install.zip” file.
Chapter 4
Install Release
Installation is easily accomplished by executing Install.exe at a preferred directory. There are two types of install packages. One package is for Rintagi to upgrade Rintagi changes to its applications to bring them up-to-date (Rintagi Installer). The other package is for the applications to install to other computers (Application Installer). Please make sure the Operating System user running these installers has administrative rights. For Developer installation, please make sure NETWORK SERVICE user has all rights to folders C:\Inetpub\wwwroot, C:\Rintagi and C:\Deploy?? where ?? is the namespace of your application. The following chart summarizes the steps to perform various types of deployment scenarios:
| Deployment Scenarios | Create New | Upgrade Existing |
|---|---|---|
| Development: An application with source code and compiler for development purpose. | Execute the latest Rintagi Installer. Choose
 and check and check
 . . |
Execute the latest Rintagi Installer. Choose and uncheck
 . . |
| Prototype: An application with source code and compiler; it is usually a duplicate of the above for prototyping purpose. | Select  and check
.
Then execute the Rintagi Installer of the same version and choose
and uncheck and check
.
Then execute the Rintagi Installer of the same version and choose
and uncheck |
On the Application Installer, select and uncheck
Then execute the Rintagi Installer of the same version and choose
and uncheck |
| Production: An application with object code only for testings (Systems Integration Testing and Users Acceptance Testing) and production purposes. | Select  and check
.
Then execute the Rintagi Installer of the same version and choose
and uncheck . and check
.
Then execute the Rintagi Installer of the same version and choose
and uncheck . |
On the Application Installer, select and uncheck
Then execute the Rintagi Installer of the same version and choose
and uncheck
. |
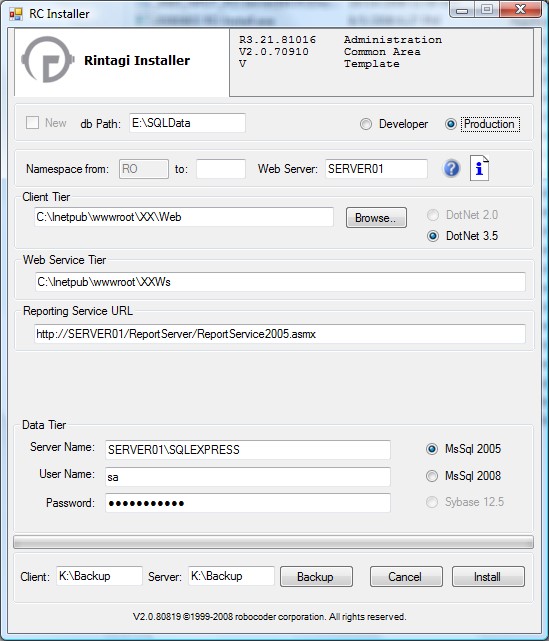
The following is an example of the Rintagi Installer:
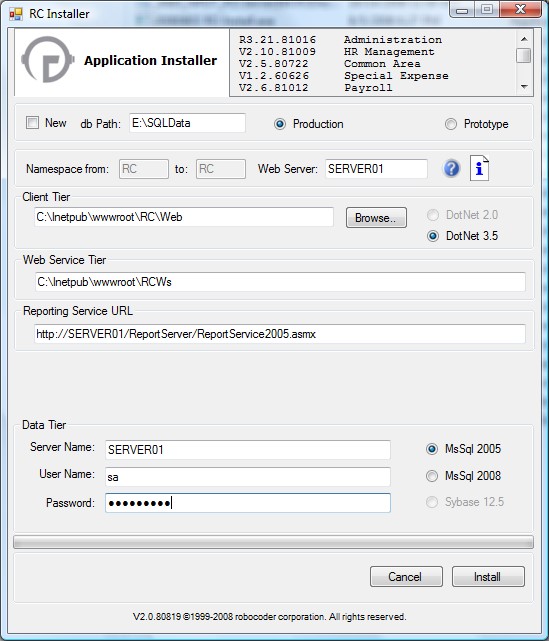
The following is an example of the Application Installer:
The ![]() icon provides the prerequisites and manual notes for all of the releases within the last 18 months.
icon provides the prerequisites and manual notes for all of the releases within the last 18 months.
The ![]() icon provides the following instructions:
icon provides the following instructions:
- System Requirements (Assuming the main web site, web service site and DBMS are all running on one server and not separate servers):
- Computer with 1.4 GHz or higher processor (2 GHz or faster is recommended)
- Minimum 1GB of RAM (2 GB or more is recommended)
- 15 GB of free hard disk space
- Operating Systems: Windows Server 2003 Service Pack 2, or Windows Server 2008, or Windows 7.
- Simplified Instructions for new Rintagi developer (Administrative rights required):
- Step 1: Add IIS 6/7 feature in Windows (must select ASP.NET 2.0 + sub-feature)
- Step 2: Download and install Visual Web Developer 2008 Express Edition, or Visual Studio 2008 standard or higher with SP1;
- Step 3: Download and install SQL Server Express 2005/2008/ 2010 with Advanced Service, or install SQL Server 2005/2008/ 2010;
- Step 3a: Configure SQL Reporting Service via "Configuration Tools -> Reporting Services Configuration" found in the start menu;
- Step 3b: Use http://localhost/Reports and http://localhost/ReportServer for the manager/web service URL respectively;
- Step 4: Download and install Microsoft Visual J#2.0 Redistributable Package;
- Step 5: Download and install Windows SDK for Windows Server 2008 and .NET Framework 3.5;
- Step 6: Download and install Microsoft Ajax Control Toolkits 2.0;
- Step 7: Download and install Crystal Reports Basic for Visual Studio 2008 (skip if Visual Studio 2008 standard or higher is installed);
- Step 8: Configure ASP.NET Webpart by running: C:\WINDOWS\Microsoft.NET\Framework\v2.0.50727\aspnet_regsql.exe;
- Step 8a: Create SQL login user “Persona” with password ”Persona” and give full right(dbo) to database “aspnetdb” created;
- Step 9: Install Rintagi via "Install.exe"; Running Install.exe:
- Check "New" if a new application is to be created;
- "db Path" is where the physical database will be created;
- "Developer" is for creating or upgrading development application;
- "Production" is for creating or upgrading production application;
- “NameSpace” should be limited to at most three characters representing a unique application;
- “Web Server” is used to populate Web.config and is assumed to be the same for the Web server, Web Service Server and Report Service Server;
- "?" is additonal help;
- "i" is release notes;
- "!" is installation log which only shows up after installation is completed;
- "Client Tier" is the virtual directory for the main web site;
- "Web Service Tier" is the web service web site;
- "Reporting Service URL" is the URL for SQL Reporting Service web service (replace "ServerName" with the appropriate web server);
- "Rule Tier", if visible, is the path where Business Facade, Access Layer, etc. are located;
- "Server Name, User Name and Password" are the credential for the SQL server;
- "Client" and "Server" are paths for Backing up Client programs and existing databases (Backup prior to upgrading); After running Install.exe, if new development application:
- Try login to the new application using user name "John Doe" and password "JohnDoe" as systems administrator;
- Verify all settings in Web.config of the Web Server and Web Service Server are correct, if necessary;
- Rename ??TmplD design database name to desired database name and add relevant data database as a pair;
- For example, if namespace is "XX" and application name is "Abc", ??TmplD should be renamed to "XXAbcD" and create a corresponding database called "XXAbc";
- Adjust entries in maintenance tables: Systems, Entity, ClientTier, RuleTier, and DataTier, if necessary;/li>