Initial Setup
Help and troubleshooting
Please check the Rintagi User Manual. Or the Gitter Channel, to connect with the community for instant help.
Setting up your development system
Dependencies
You can setup the dependencies by yourself or you can follow the below process to use our script file to setup it up for you.
- Running the PowerShell script with administrative access enables developers to install Rintagi in approximately 5 - 10 minutes.
- Open Powershell on your windows machine as an administrator.
- New users are required to run the prerequisite PowerShell file available here. This script will set up your machine with the Rintagi Installer environment within an hour. The majority of the time is spent on installing visual studio, SQL server. If these dependencies are already installed on your system, this process will be much shorter.
- Optional scripts to install dependencies:
- SQL Express: rintagi_machine_setup_install_sqlexpress.ps1 (If you want SQL Express as the database and haven't installed it yet. If you have your own SQL Server setup, just make sure it has mixed mode turned on)
- Dev Tools: rintagi_machine_setup_install_devtools.ps1 (if development is on this machine, it would install minimal required dev tools)
- Ensure you are running PowerShell (CLI) as an administrator and to reboot system at the end after installation.
After you have sucessfully installed all the dependencies, you are now ready to install Rintagi on your machine . Please go to the installation process at the end of this document.
Manual Dependencies Setup Process
To run Rintagi in development you need:
Operating System Requirements
- [Microsoft Windows 7, 8.0, 8.1 or 10 with latest Service Pack](https://www.microsoft.com/en-ca/download/windows.aspx)
- [Microsoft Windows Server](https://www.microsoft.com/en-ca/download/details.aspx?id=5023) 2008(32 or 64 bit) /2008 R2 (32 or 64 bit) 2012 (64 bit) /2012 R2 (64 bit) All Edition with latest Service Pack
- IIS 6.0/7.0/7.5/8.5
- [Microsoft Windows Server 2008](http://www.microsoft.com/downloads/details.aspx?FamilyID=e6e1c3df-a74f-4207-8586-711ebe331cdc&displaylang=en )(32 or 64 bit) /2008 R2 (32 or 64 bit) 2012 (64 bit) /2012 R2 (64 bit) All Edition with latest Service Pack or later
Software Requirements
- Google Chrome Browser / IE browser 9.0 or later / Firefox browser 40.0 or later
- [Microsoft Visual Studio](https://www.visualstudio.com/) 2010 Express or higher (Development System only)
- [Microsoft .NET Framework 3.5 or 4.5.2](https://www.microsoft.com/en-us/download/details.aspx?id=53344) with SP1 or higher
- [Microsoft® SQL Server® 2012 Feature Pack](https://www.microsoft.com/en-us/download/details.aspx?id=29065) (Search for Microsoft® System CLR Types for Microsoft® SQL Server® 2012 and download the x64 package)
- [Microsoft Report Viewer Redistribution 2012](http://www.microsoft.com/en-ca/download/details.aspx?id=35747) (32bit or 64bit)
- [Crystal Report Runtime 13 Package](http://tektutorialshub.com/how-to-download-and-install-crystal-report-runtime)
- [Microsoft Access Database Engine 2013](https://www.microsoft.com/en-us/download/details.aspx?id=50040) (32bit or 64bit)
- [Microsoft SQL Server Express](https://www.microsoft.com/en-us/sql-server/sql-server-editions-express) 2008/2008 R2/2014 (32 or 64 bit) with latest Service Pack, or Microsoft SQL 2008/2008/2014 Express Edition, with latest Service Pack (usually for development only)
- [SQL Server Management Studio](https://go.microsoft.com/fwlink/?linkid=849819)
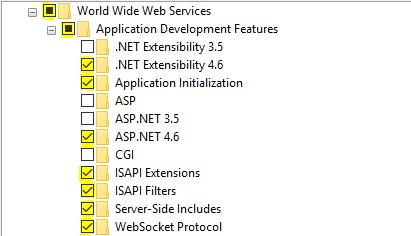
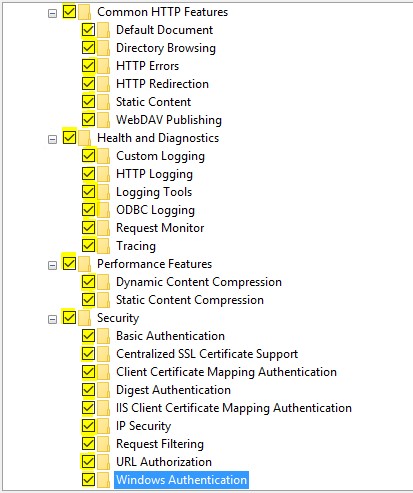
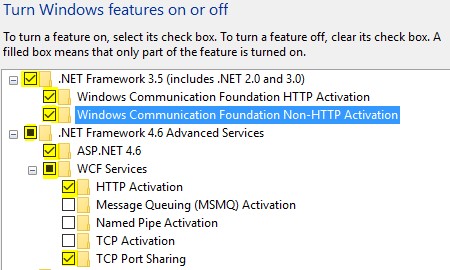
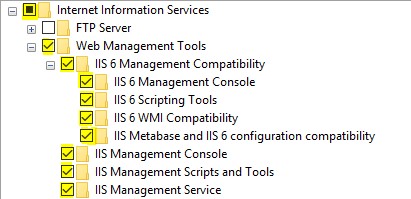
Windows 10 Configuration Requirement
Turn on Windows Features for Web Services
Please make sure a Minimum of 30GB disk space is available
Please make sure the checkboxes are selected as shown below , this will prompt a request to download the needed features automatically.


Windows 8.1 Configuration Requirement
Turn on Windows Features for Web Services
Please make sure a Minimum of 10GB disk space is available
Please make sure the checkboxes are selected as shown below , this will prompt a request to download the needed features automatically.


Web Services Configuration
ASP.Net State Service Requires Start Automatically
- Login with administrator privilege
- Right click on “Windows Start icon” on desktop at bottom left hand corner
- Select “Control Panel” in dialogue box
- Left double click “Administrative Tools”
- Left double click “Services”
- Right click on ASP.net State Service; and left single click on “Properties”
- Change “Manual” to “Automatic” on Startup type by using drop down arrow
- Click “Start” to start the service; then click “OK”
Folders with Full Permission on Drive C
- Open Windows Explorer in the bottom taskbar
- Expand “This PC”, then left double click on “Local Disk (C:)” on the right hand side panel
- Right single click on Inetpub folder on Drive C
- Left single click on “Properties”
- Left click on “Security” tab on Inetpub Properties
- Left click on “Edit” button; then click “Add” button
- Type “Network Service” in “Enter the object names to select”, and click “Check Names”
- Then click “OK” button
- Put a “Check Mark” on Full Control under “Allow”
- Click “Apply” button. If “Error Applying Security” message pops up, keep click “Continue”
- Click “OK” button to exit “Permissions for “Inetpub”
Create Backup Directory
Create a new folder named Backup and follow the above process to set up full permission for the folder.
- Open Windows Explorer in the bottom taskbar
- Expand “This PC”, then left double click on “Local Disk (C:)” on the right hand side panel
- Right single clicks on white space, and select “New Folder” in dialogue box
- Name the New Folder to “Backup”
- Left single click on “Backup and select “Properties”
- Left click on “Security” tab on “Backup” Properties
- Left click on “Edit” button; then click “Add” button
- Type “Everyone” in “Enter the object names to select”, and click “Check Names”
- Then click “OK” button
- Put a “Check Mark” on Full Control under “Allow”
- Click “OK” button to exit “Permissions for “Backup”
Create Rintagi Directory
Create a new folder named Rintagi and follow the above process to set up full permission for the folder.
- Open Windows Explorer in the bottom taskbar
- Expand “This PC”, then left double click on “Local Disk (C:)” on the right hand side panel
- Right single clicks on white space, and select “New Folder” in dialogue box
- Name the New Folder to "Rintagi"
- Left single click on Rintagi and select “Properties”
- Left click on “Security” tab on "Rintagi" Properties
- Left click on “Edit” button; then click “Add” button
- Type “Everyone” in “Enter the object names to select”, and click “Check Names”
- Then click “OK” button
- Put a “Check Mark” on Full Control under “Allow”
- Click “OK” button to exit “Permissions for “Rintagi”
Install Microsoft SQL Server Express
*If Windows 10 is using 32 bit, please install 32-bit software; otherwise install 64-bit accordingly. Microsoft SQL Server 2014 Express with Advanced Features Microsoft SQL Server 2014 Express with Advance Features
After completion of the download open the same and double click on the setup icon .
- Click on “New SQL Server Stand-alone Installation”
- On the End User License Agreement, check the box I accepts the licensing terms and conditions and then click Next
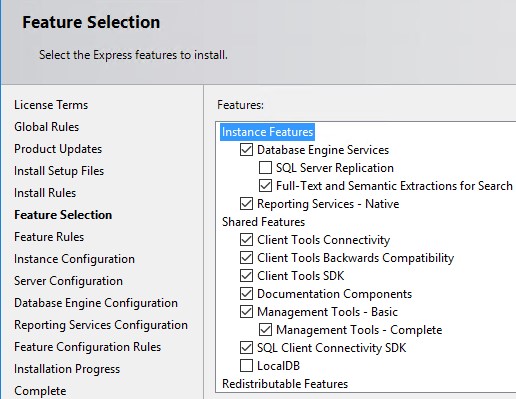
- On the Feature Selection screen, put a check mark in selection as picture shown, then click Next to proceed
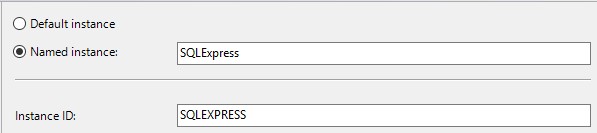
- Select SQLExpress in Name Instance on the Instance Configuration screen and click Next
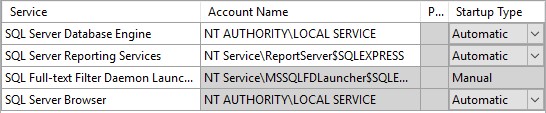
- On Server Configuration screen, use NT Authority\LOCAL SERVICE for startup SQL server
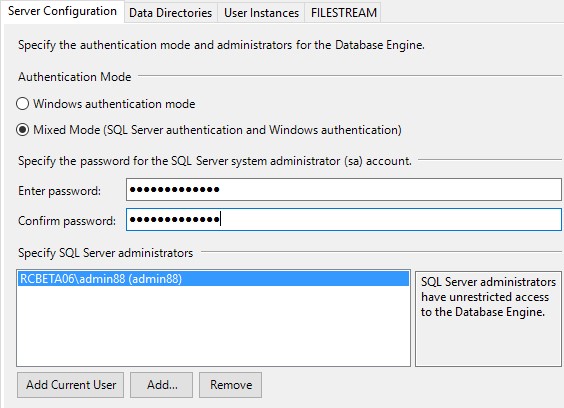
- On Database Engine Configuration screen, select the Mixed Mode (Windows Authentication and SQL Server Authentication) and fill out the password for sa. Click Add Current User button under Specify SQL Server Administrator. Click Next to proceed
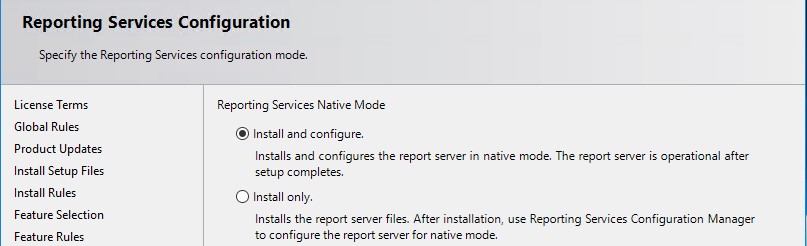
- Leave Install and configure on Reporting Service Native Mode screen, click Next to proceed
Installation
RO package is the master package with which you can create development package for your personalized applications. Changes made to the RO can be applied to your developed applications.
Installing RO Package
Please download the RO package .
Double click to open the installer and accept the Software License and Terms of Service.
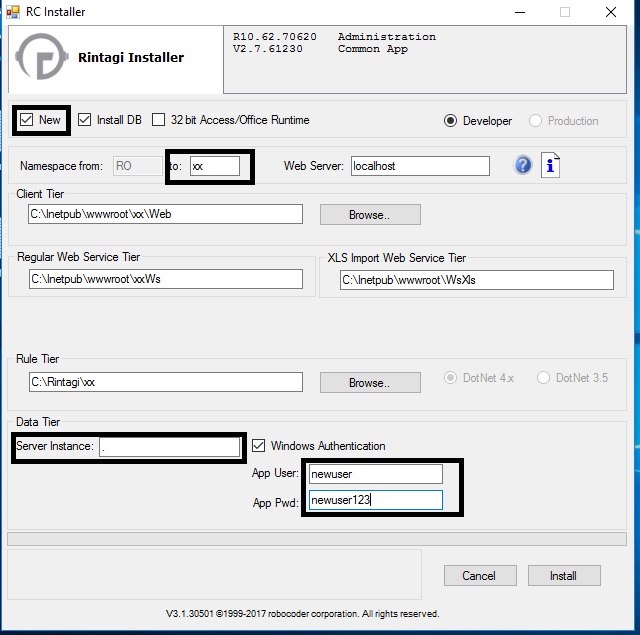
Fill out the form as shown in the picture below,
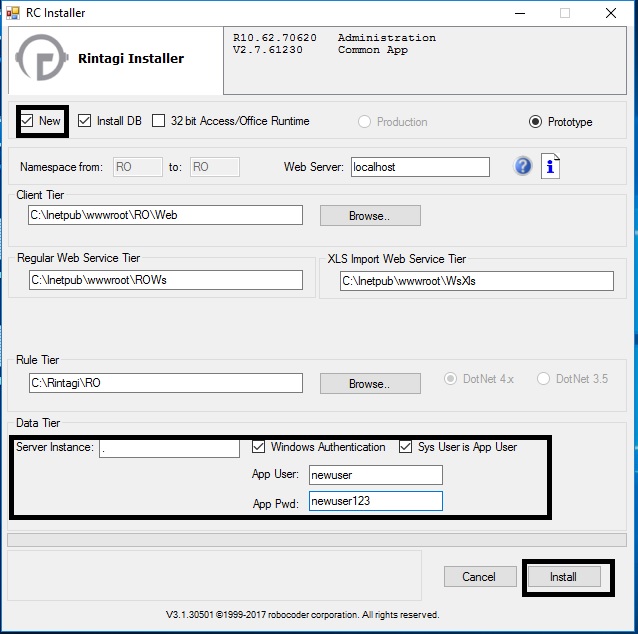
In the case of SQL Server Express, the Server Instance should be yourservername\SQLEXPRESS
Click on install and wait for the deployment to complete.
Once the deployment is complete you can access the site by going to localhost/ro.

Please login to the new application using user name "John Doe" and password "JohnDoe" as systems administrator . You will be directed to change your password immedeately after the first signin.
Installing Development Package from RO
Inorder to create a development package from your RO System, please follow the below process

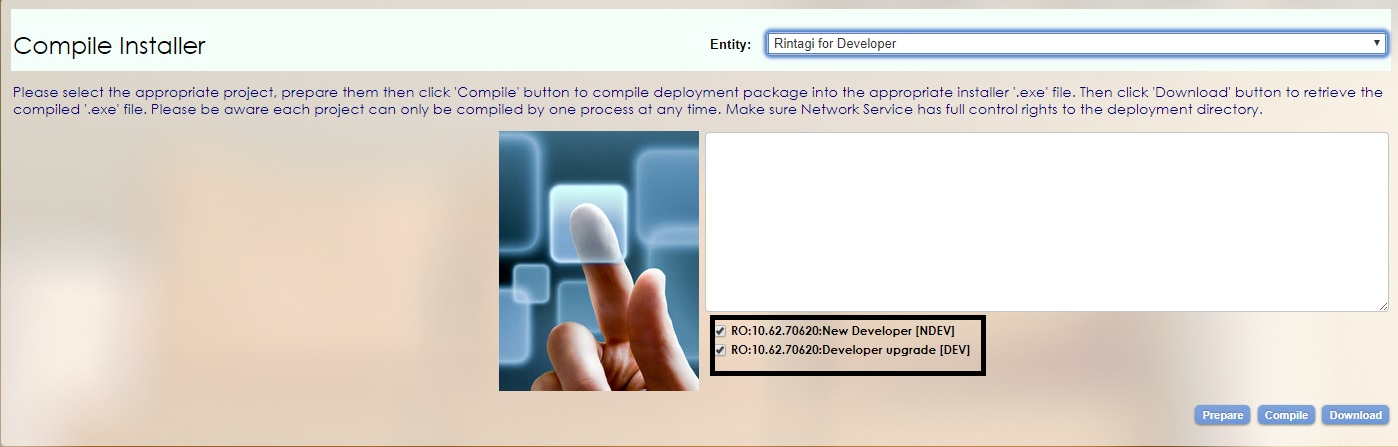
Choose the compile installer screen, and select the entity as "Rintagi as Developer" and choose New Developer if you are doing this for the first time, or click on the other checkbox to upgrade your application. The information is shown below,
Click on Prepare, and wait for the package to be prepared, once this is done click on compile for the package to be compiled. After these two steps are done click on download to get the package for the development application.
Double click to open the installer and accept the Software License and Terms of Service.
Fill out the form as shown in the picture below,
Once the deployment is complete you can access the site by going to localhost/xx (your given namespace) .
Please login to the new application using user name "John Doe" and password "JohnDoe" as systems administrator . You will be directed to change your password immedeately after the first signin.
Welcome to your brand new application. Happy Developing.
Please follow the Rintagi User Guide to go through each section in developing your application using the Rintagi Development System.
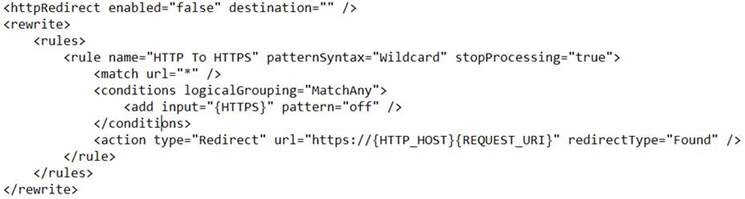
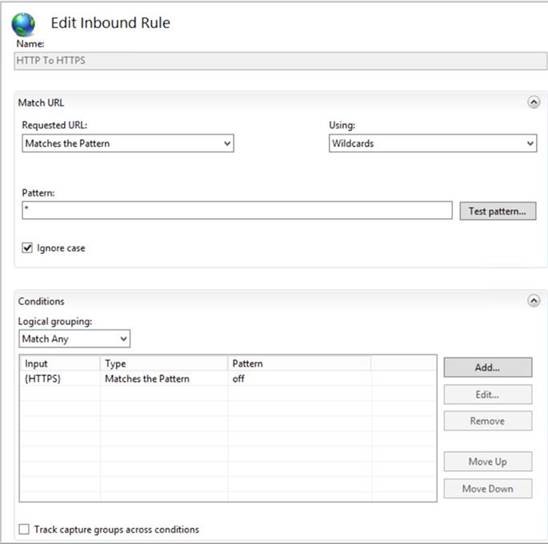
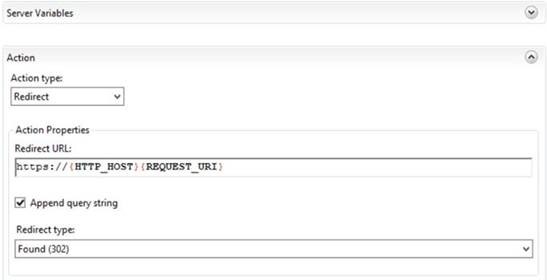
Http to Https URL ReWrite
Download the URL Rewrite tool extension
Add a Blank rule for Inbound Rule
Configure Rule settings exactly as follows
Web.Config Change