Rights Management
Chapter 1
Overview
Rights management is an integral part of Rintagi. All of the rights management is automatically built in to all screens, reports or import wizards as they are generated. Row Authority is used to authorize access to row information; Column Authority is used to authorize column information. Together they form the role(s) for a user.
Authentication
A user name and password are required to access a Rintagi application. A password can be assigned or changed by an administrator once a user is established (as discussed in the next chapter).
Command: Operation -> Manage User -> Change Password
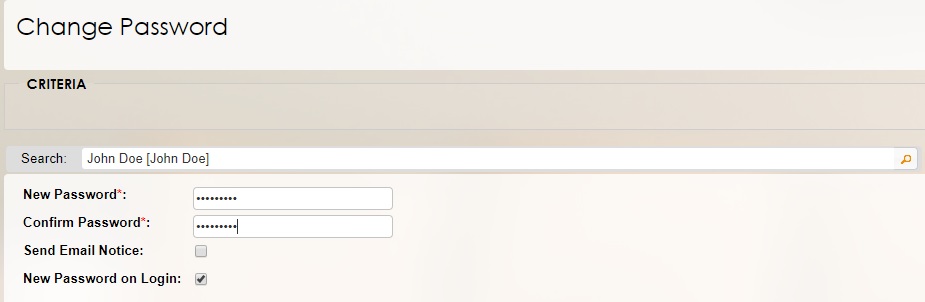
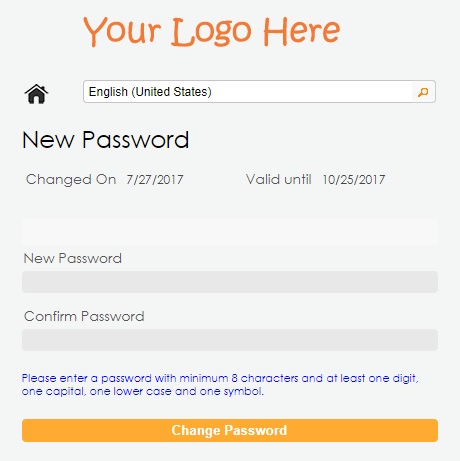
A password change notification may be sent to the user’s email address. This fully-encrypted password is stored in the database so that not even professionals who have access to the database can decrypt it. Subsequently users may change their password by clicking the “Change Password” link from the login panel after successfully logging in.
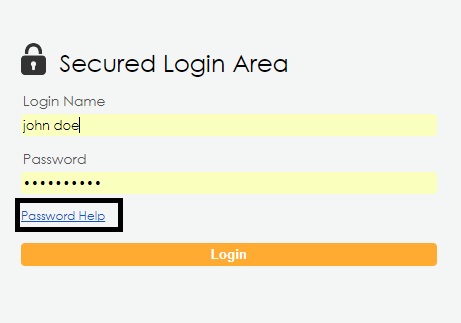
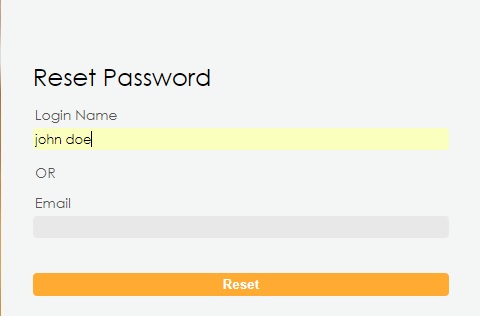
A forgotten password screen is also available on the sign in page. Use the Password Help link to bring up the forgotten password page.
Menu Authorization
There are three authorization levels. For the first level, the login user can be granted access to each menu item by any of the following related entities:
- User Groups
- Companies
- Projects
- Agents
- Brokers
- Customers
- Investors
- Members
- Vendors
Menu Permission
Command: Client Tier -> Menu -> Menu IDE -> Menu Permission
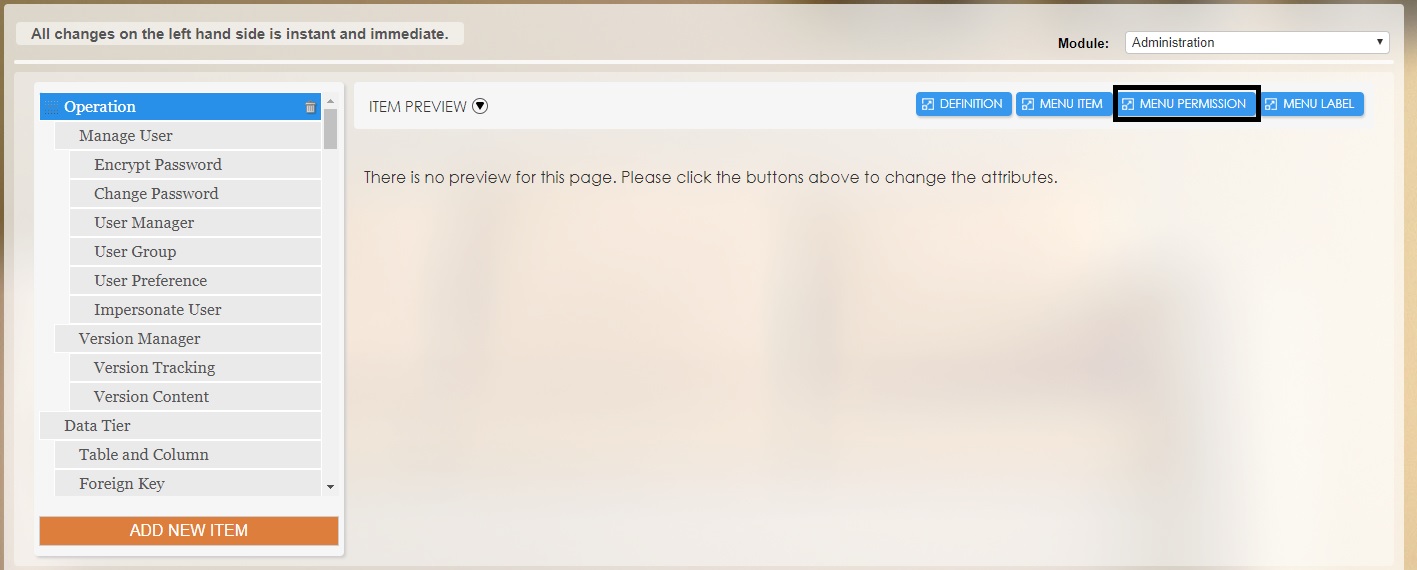
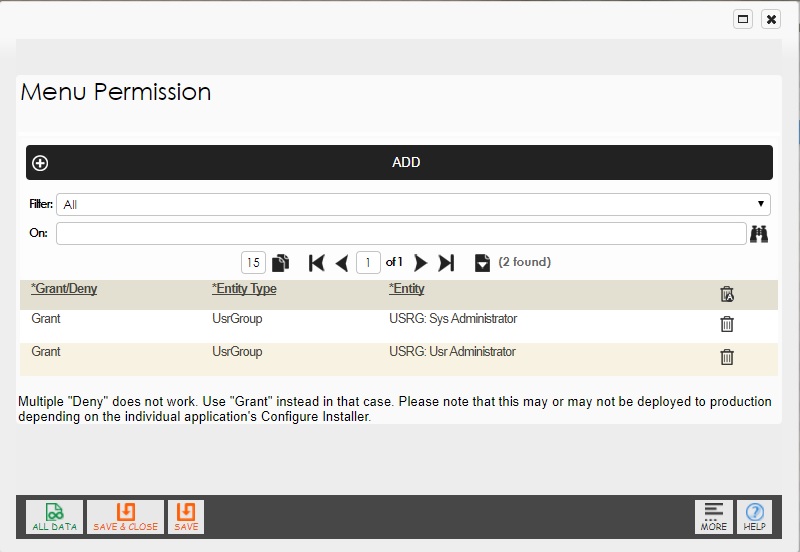
Click on the menu item for which the permission needs to be changed. In the example above, the operation screen the permission is only available to the systems administrator. Additional user groups can be designated by adding more rows.Multiple "Deny" does not work. Use "Grant" instead in that case.
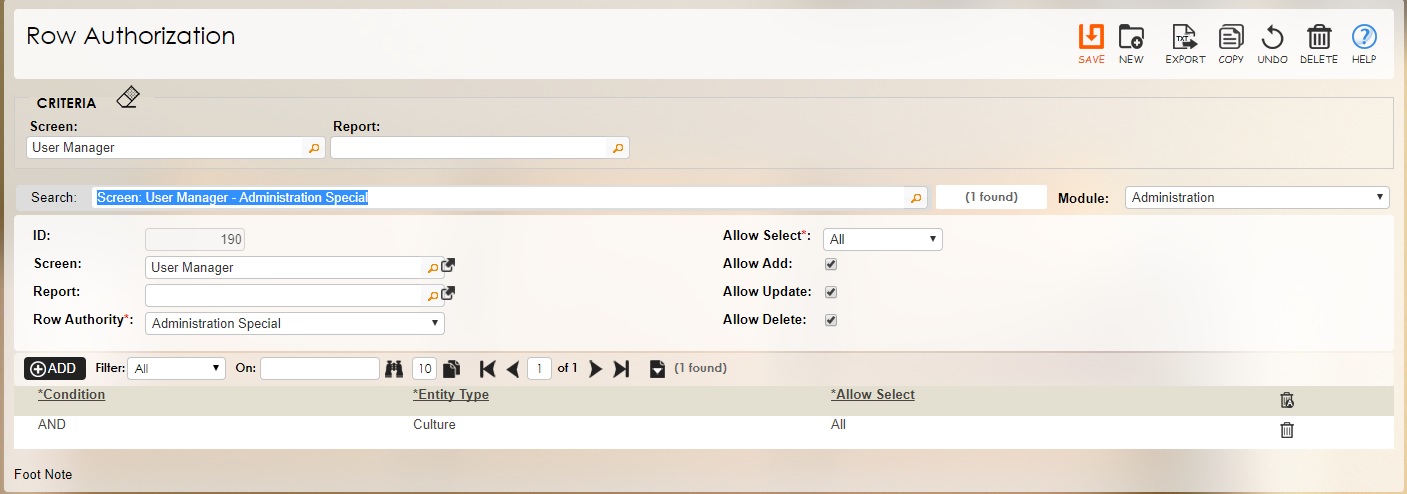
Row and Column Authorization
The second level of authorization is row and column authorization. Together they form another role for a user. Once access to the menu level is attained, only the following columns will be permission-managed:
- UsrId – Integer (The user login ID)
- UsrGroupId – Smallint (The login user belongs to this group)
- UsrGroupLs – Varchar (The login user belongs to these groups [comma-delimited and enclosed in parenthesis])
- CultureId – Tinyint (The login user’s culture)
- CompanyId – Smallint (The login user belongs to this company)
- CompanyLs – Varchar (A list of the companies the login user belongs to [comma-delimited and enclosed in parenthesis])
- ProjectId – Smallint (The login user belongs to this Project)
- ProjectLs – Varchar (A list of Projects the login user belongs to [comma-delimited and enclosed in parenthesis)
- AgentId – Integer (The agent’s ID, [sales representative, etc.])
- BrokerId – Integer (This is the broker’s ID)
- CustomerId – Integer (This is customer’s ID)
- InvestorId – Integer (This is the investor’s ID)
- MemberId – Integer (This is the ID for the member, employee, etc.)
- VendorId – Integer (This is the vendor’s ID)
- InputBy – Integer (This is the user login ID that created the record)
- ModifiedBy – Integer (This is the user login ID that modified the record)
If you want more columns to be permission-managed than the above, simply add them to the table called “CtPermKey” and Rintagi will take care of the rest. Anyone who has access to the screen/report that retrieves data from a table that does not contain any of the above permission-managed columns may access all the data inside that table. A user can be designated to ‘view’, ‘add’, ‘update’ and/or ‘delete’ on a particular row. Any column can be designated as “Visible and Enabled for Edit”, “Visible but not Editable”, or “Invisible”. In summary, the following functionalities are available:
- One user may have many roles,
- A user may have different roles within a combination of company, project and application,
- A user may impersonate many other users and take on their roles,
- If there is a conflict assigning authorities within a role, the last one takes precedence (pessimistic),
- If there is a conflict among roles, the one with higher authorities takes precedence (optimistic),
- Classified information may only be revealed to specified Column Authorities,
- Approval can be performed only by specified Column Authorities;
- A user may belong to multiple companies, multiple projects, and multiple user groups,
- Unlimited hierarchy for companies, projects, etc.
- Default roles can be overridden in individual screens and reports.
Object Authorization
The third level of authorization is Object permission. Objects on a screen can be permission managed . The objects can be made visible, invisible or read only status .
Command: Client Tier -> Screen -> Object IDE -> Object Permission

The first step to select the object in the screen which needs to be permission managed, after selecting the object, press on the obj permission button to set up the permissions for this object.
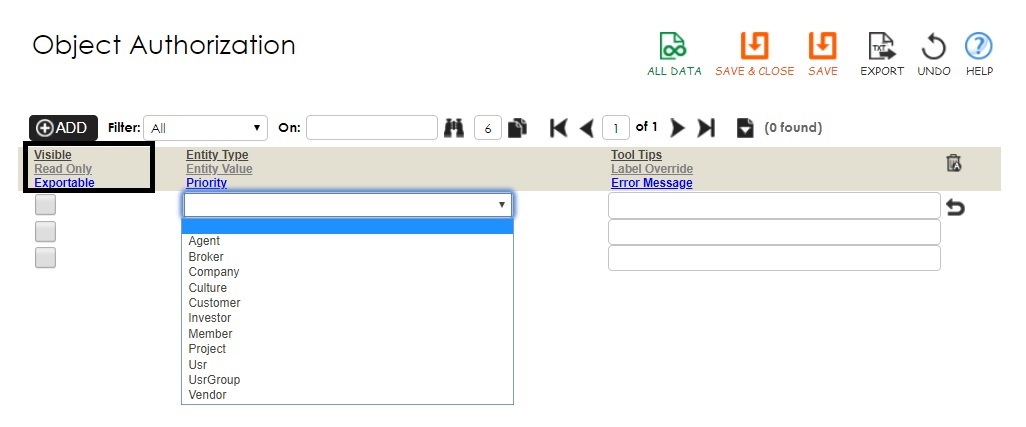
The user can be granted access to each menu item by any of the following related entities:
- User Groups
- Companies
- Projects
- Agents
- Brokers
- Customers
- Investors
- Members
- Vendors
Chapter 2
Configuration
Because rights management is integral to Rintagi it is built in to all screens or reports as they are generated. Row Authority is used to authorize access to row information; Column Authority is used to authorize column information. Together they form the role(s) for a user.
Adding a Company
Mandatory: Rintagi must find at least one company in this table. During installation one company is installed into the table named “Company”. This table is inside the database with a name that ends with “Cmon”. A screen has not yet been established for this table because more columns can be added to this table. For the present, use the “fire-hose-mode” of the SQL Server Management Studio to add more companies to this table.
Adding a Project
Optional: As with adding companies, projects can be added via the “fire-hose-mode” of the SQL Server Management Studio. Use this same procedure for adding to the Customers, Vendors, Agents, Brokers, etc. tables.
Default Row Authority
Mandatory: One and only one row must be checked as the Administrator of this table. Any additional user-defined Default Row Authorities must be assigned to User Groups as roles.
Appropriate permissions are:
- All
- None
- Self
Command: Rule Tier -> Authorization -> Row Default
| Schema Characteristics | Description |
|---|---|
| Authority Id | This internal ID uniquely represents this row authority default. |
| Row Authority Description | A description of the Default Row Authority (50 characters or less). |
| Select | The appropriate report and menu permission selection. |
| Add | Check if this Row Authority allows insertion. |
| Update | Check if this Row Authority allows updating. |
| Delete | Check if this Row Authority allows deletion. |
| Administrator | Check if this is a system administrator Row Authority. |
| Password Override | User group password required when this authority is selected, if needed. |
| User | The selected permission for user-related items. |
| User Group | The selected permission for user-group related items. |
| Culture | The selected permission for a culture. |
| Company | The selected permission for company related items. |
| Project | The selected permission for project related items. |
| Agent | The selected permission for agent related items. |
| Broker | The selected permission for broker related items. |
| Customer | The selected permission for customer related items. |
| Investor | The selected permission for investor related items. |
| Member | The selected permission for member related items. |
| Vendor | The selected permission for vendor related items. |
Row Authority Override
Optional: Any additional instruction here will override the Default Row Authority (defined previously) when accessing this selected screen or report.
Command: Rule Tier -> Authorization -> Row Authority Override
User Group Configuration
Mandatory: To set up other users at least one user is required and this user should have administrative rights. Every user must belong to one or more user groups. Contents in the grid below shall override the default row and column authorities. If there is a conflict, specific shall override general in the order of (System, Company, Project) and then the last one wins.
Command: Operation -> Manage User -> User Group
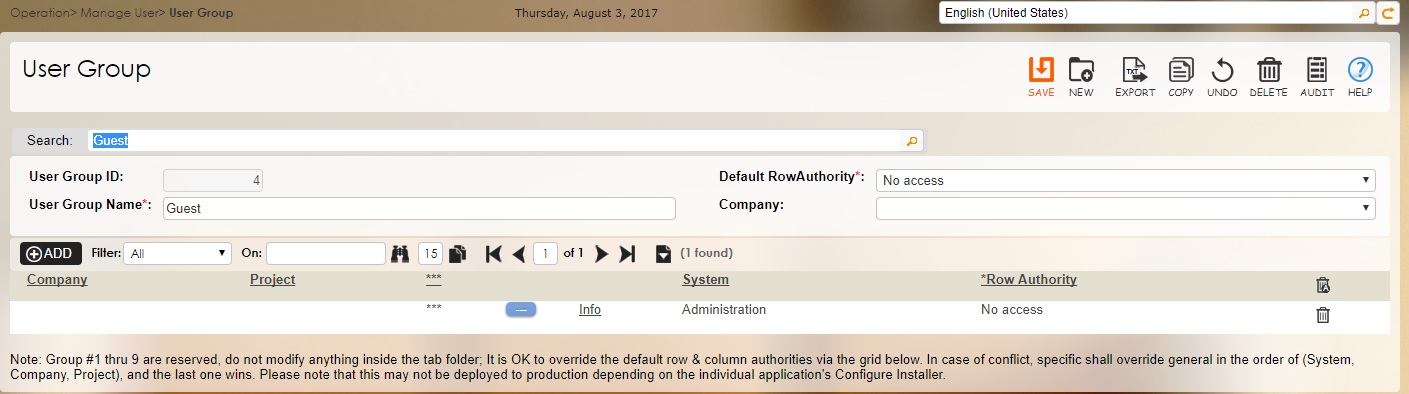
| Schema Characteristics | Description |
|---|---|
| User Group ID | An internal ID that uniquely identifies this user group. |
| User Group Name | The unique User Group Name (50 characters or less). |
| Default Row Authority | The row authorization to be used as the default. |
| Default Column Authority | The column authorization to be used as default. |
| Company | The user group belongs to this company, if applicable. |
| Company (data grid) | This company may override default authorities. |
| Project | This project may override default authorities. |
| System | This system may override default authorities. |
| Row Authority | This row authority for the selected combination of Company, Project and System for this user group will override the default. |
| Column Authority | This Column Authority for the selected combination of Company, Project and System for this user group will override the default. |
| Default | Check when the Column Authority selected is a default for all systems. |
Adding a User
Mandatory: The User Manager must be assigned administrative rights in order to set up other users. The user manager screen is composed of three tabs:
- Main Info
- Status
Command: Operation -> Manage User -> User Manager

| Schema Characteristics | Description |
|---|---|
| User Id | The internal ID uniquely identifying this user. |
| Login Name | The unique login name for this user. |
| User Email | User's email address, if available. |
| User Name | User's name in full. |
| User Groups | A list of the user groups that this user belongs to. (User must belong to at least one user group). |
| Culture | The culture setting for this user. |
| Default Company | The company to be selected after login. |
| Default Project | The project to display after login. |
| Default System | The system to display after login. |
| Internal User | Check if server-side printers should be made available for this user. |
| Technical User | Check if a detailed technical error trace should be made available to this user. |
| Impersonating | Click the appropriate link to view/edit the impersonated user. |
User Manager: Status
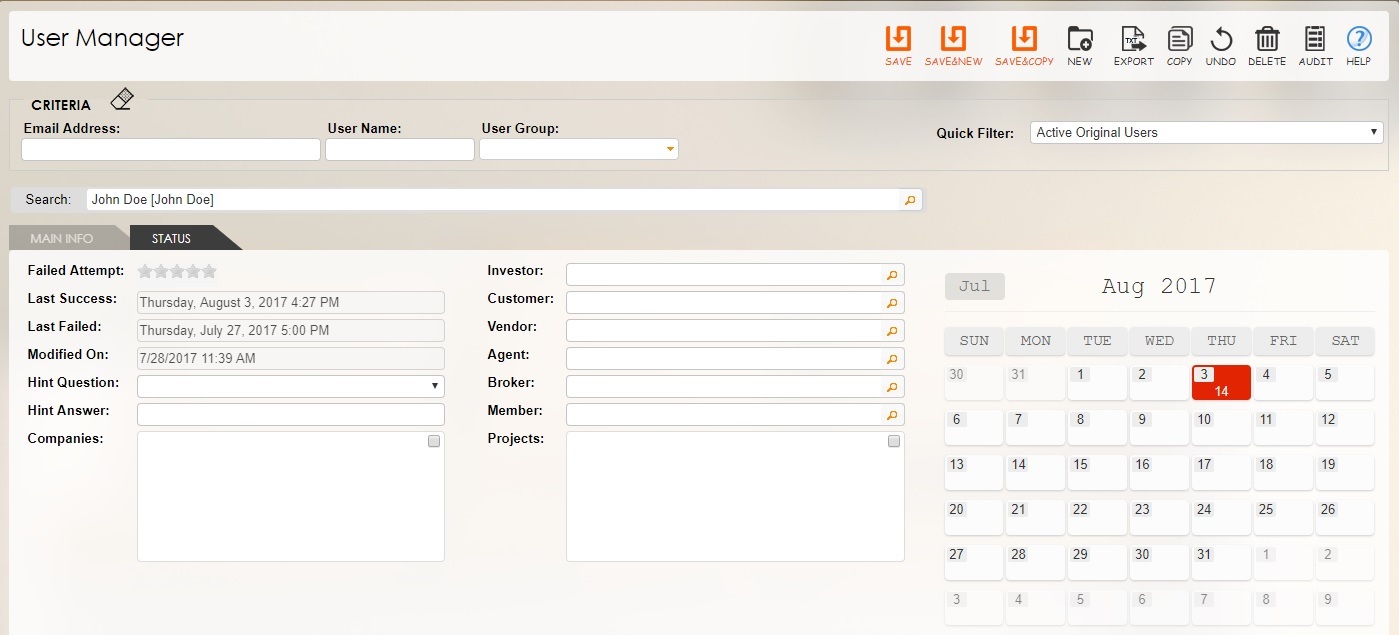
| Schema Characteristics | Description |
|---|---|
| Failed Attempt | The number of times that this user has failed at login. |
| Last Success | The last time that this user successfully completed login. |
| Last Failed | The last time that this user failed to login. |
| Hint Question | The hint question to be used if password is forgotten. (Hint will be emailed to user). |
| Hint Answer | The hint answer requiring a match to generate email. |
| Active | Uncheck this if this user needs to be disabled. |
| Modified On | The date this user was last modified. |
| Companies | The user has access to this list of the companies (empty field indicates all companies). |
| Projects | The user has access to these projects (empty field indicates all projects). |
| Investor | The user has access to this investor (empty field indicates all investors). |
| Customer | The user has access to this customer (empty field indicates all customers). |
| Company | This user group belongs to this company, if applicable. |
| Vendor | The user has access to this vendor (empty field indicates all vendors). |
| Agent | The user has access to this agent (empty indicates all agents). |
| Broker | The user has access to this broker (empty indicates all brokers). |
| Member | The user has access to this member (empty field indicates all members). |
Impersonating a User
Optional: The administrator may designate impersonation capabilities to a user so that he/she would inherit additional rights provided by the impersonated users, including viewing and editing additional data. A supervisor who needs to monitor his/her subordinates will find this useful. In the case of a sudden dismissal, impersonation also enables another employee to take over the duties of the dismissed user temporarily and immediately.
Command: Operation -> Manage User -> Impersonate User

Chapter 3
Report & Import Wizard
For reporting, rights management is automatic on criteria only. Advanced data filtering can be done by passing the following parameters to the Stored Procedure called by the Regular Field Clause (defined in Report Definition):
| Parameter | Data Type | Description |
|---|---|---|
| @Usrs | varchar(1000) | Advanced: A list of the current login user ID, UsrId, followed by the impersonated UsrId, if any, delimited by CHAR(191). |
| @RowAuthoritys | varchar(1000) | Advanced: A list of the current login row authority ID, followed by the impersonated row authority ID, if any, delimited by CHAR(191). |
| @UsrId | int | The user ID of the current login. |
| @usrName | nvarchar(50) | The username of the current login user. |
| @currCompanyId | smallint | The current company ID. |
| @wClause | varchar(4000) | The simplest form of this is “WHERE 1=1” but it may also contain a special filter rule defined in the client tier. |
Warning: Anyone having access to any import wizard may import data to the designated tables.
Chapter 4
Two - Factor Authentication
Rintagi provides 2FA , which is an extra layer of security used to make sure the user trying to gain access to the system is who they say they are.
Setting up a 2FA on the system is a very straight forward process,
Command: My Account -> Enable Two Factor Authentication
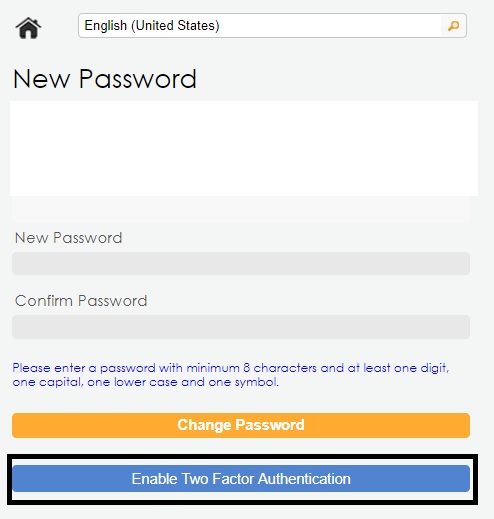
The first step is to enable the 2 Factor Authentication on your user login, by clicking on the Enable 2 Factor Authentication button. An email with the setup code will be sent to the email associated with this account.
Enter the code press enter, the system has now setup 2FA for your login to the system.
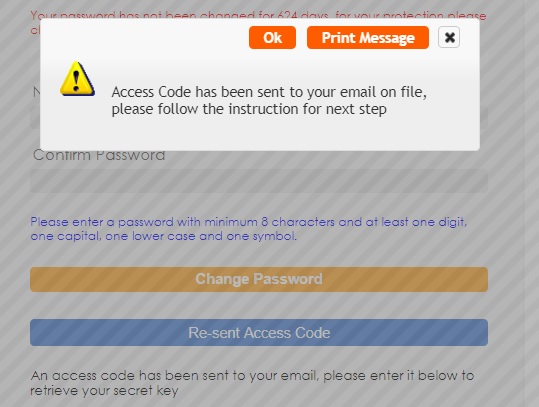
The next time you sign into the system and enter your system password , the system now shows new screen requesting for the generated code sent to your email as part of the 2FA.
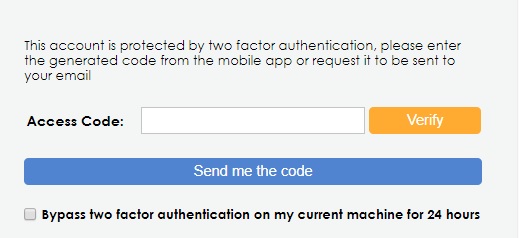
Enter the code send to the email and verify the same on the system. Once the code is verified the system grants accses to the application.
2FA can be disabled anytime by going to the My Account settings screen after a successful login.